

How To Use Cmake On Windows
This browser is no longer supported.
Upgrade to Microsoft Edge to take advantage of the latest features, security updates, and technical back up.
CMake projects in Visual Studio
CMake is a cross-platform, open-source tool for defining build processes that run on multiple platforms. This article assumes you're familiar with CMake. For more information nearly CMake, see the CMake documentation. The CMake tutorial is a practiced starting point to learn more.
Note
CMake has become more and more integrated with Visual Studio over the past few releases. To see the documentation for your preferred version of Visual Studio, utilise the Version selector control. It'due south establish at the top of the table of contents on this page.
Visual Studio'due south native support for CMake enables you to edit, build, and debug CMake projects on Windows, the Windows Subsystem for Linux (WSL), and remote systems from the same instance of Visual Studio. CMake project files (such every bit CMakeLists.txt ) are consumed directly by Visual Studio for the purposes of IntelliSense and browsing. cmake.exe is invoked directly by Visual Studio for CMake configuration and build.
Installation
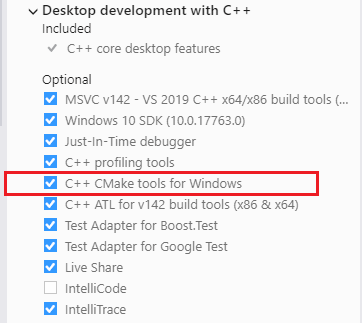
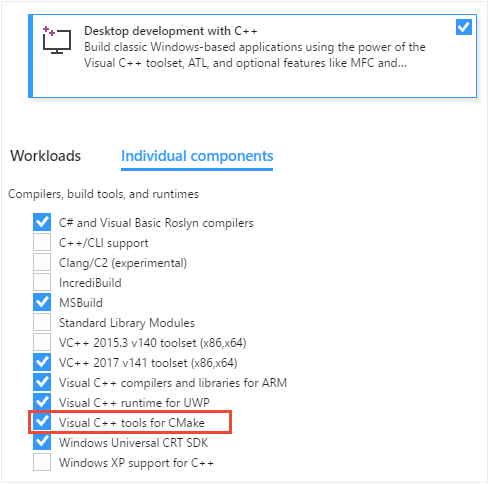
C++ CMake tools for Windows is installed every bit part of the Desktop development with C++ and Linux Development with C++ workloads. Both C++ CMake tools for Windows and Linux Evolution with C++ are required for cross-platform CMake evolution.
For more than information, see Install the C++ Linux workload in Visual Studio.
IDE integration
When you open a folder containing a CMakeLists.txt file, the following things happen.

-
Visual Studio adds CMake items to the Project menu, with commands for viewing and editing CMake scripts.
-
The Solution Explorer displays the folder structure and files.
-
Visual Studio runs CMake and generates the CMake enshroud file (
CMakeCache.txt) for the default configuration. The CMake command line is displayed in the Output Window, forth with other output from CMake. -
In the background, Visual Studio starts to index the source files to enable IntelliSense, browsing information, refactoring, and and then on. Every bit you work, Visual Studio monitors changes in the editor and also on disk to keep its index in sync with the sources.
Note
Starting in Visual Studio 2022 version 17.one Preview 2, if your peak-level CMakeLists.txt exists in a subfolder and not at the root of the workspace, yous'll be prompted whether you'd like to enable CMake integration or not. For more information, see CMake partial activation.
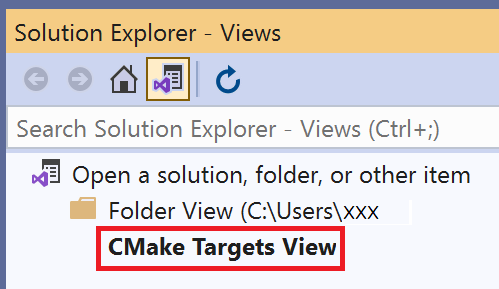
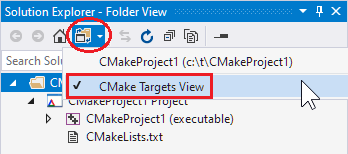
Once CMake enshroud generation has succeeded, you lot can also view your projects organized logically past targets. Cull the Select View push button on the Solution Explorer toolbar. From the list in Solution Explorer - Views, select CMake Targets View and printing Enter to open the targets view:
Choose the Bear witness All Files push button at the pinnacle of Solution Explorer to run across all the CMake-generated output in the out/build/<config> folders.
Use the CMakeLists.txt file in each project folder merely as you would in whatever CMake project. You tin can specify source files, find libraries, set compiler and linker options, and specify other build system-related information. For more data on CMake linguistic communication services provided past Visual Studio, see Editing CMakeLists.txt files.
Visual Studio uses a CMake configuration file to drive CMake cache generation and build. For more information, see Configuring CMake projects and Building CMake projects.
To pass arguments to an executable at debug fourth dimension, y'all can utilize some other file called launch.vs.json . For more information on debugging cross-platform CMake projects in Visual Studio, come across Debugging CMake projects.
Most Visual Studio and C++ language features are supported by CMake projects in Visual Studio. Examples include:
-
Edit and Proceed for CMake projects
-
Incredibuild integration for CMake projects
-
AddressSanitizer back up for CMake projects
-
Clang/LLVM back up
Note
For other kinds of Open Folder projects, an additional JSON file CppProperties.json is used. This file is not relevant for CMake projects.
Configuring CMake projects
The CMake configure pace generates the project build system. It's equivalent to invoking cmake.exe from the command line. For more data on the CMake configure pace, see the CMake documentation.
Visual Studio uses a CMake configuration file to drive CMake generation and build. CMakePresets.json is supported by Visual Studio 2019 version 16.ten or later and is the recommended CMake configuration file. CMakePresets.json is supported directly past CMake and can be used to drive CMake generation and build from Visual Studio, from VS Code, in a Continuous Integration pipeline, and from the command line on Windows, Linux, and Mac. For more information on CMakePresets.json , meet Configure and build with CMake Presets. CMakeSettings.json is bachelor for customers using an earlier version of Visual Studio. For more information on CMakeSettings.json , see Customize CMake build settings.
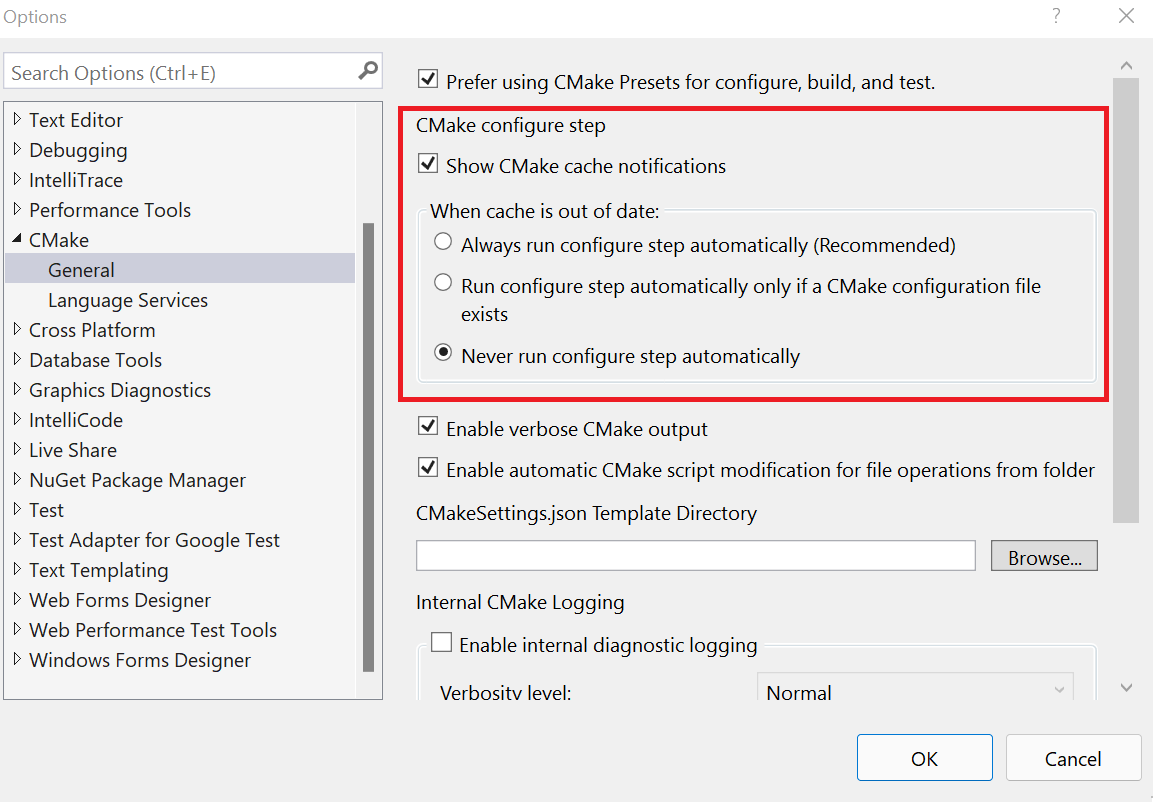
When you make significant changes to your CMake configuration file or a CMakeLists.txt file, Visual Studio will automatically run the CMake configure pace. You can invoke the configure footstep manually: Select Project > Configure Enshroud from the toolbar. Y'all tin can also change your configuration preferences in Tools > Options > CMake > General.
If the configure step finishes without errors, and so the data that'southward available drives C++ IntelliSense and linguistic communication services. Information technology's too used in build and debug operations.
Y'all tin can also open an existing CMake cache in Visual Studio. For more information, see Open an existing enshroud.
Customize configuration feedback and notifications
By default, well-nigh configuration messages are suppressed unless at that place'due south an error. To see all messages, select Tools > Options > CMake > Enable verbose CMake diagnostic output.
Y'all can also disable all CMake cache notifications (gold bars) by deselecting Prove CMake cache notification.
Troubleshooting CMake cache errors
If you need more data about the land of the CMake cache to diagnose a problem, open up the Project principal menu or the CMakeLists.txt context menu in Solution Explorer to run one of these commands:
-
View CMakeCache.txt opens the
CMakeCache.txtfile from the build directory in the editor. Any edits y'all brand here toCMakeCache.txtare wiped out if you make clean the enshroud. To brand changes that persist subsequently you clean the cache, run across Customize CMake settings or Configure and build with CMake Presets. -
Delete Enshroud and Reconfigure deletes the build directory and reconfigures from a make clean cache.
-
Configure Cache forces the generate step to run fifty-fifty if Visual Studio considers the environment up to date.
Edifice CMake projects
The CMake build step builds an already generated projection binary tree. Information technology'due south equivalent to invoking cmake --build from the command line. For more data on the CMake build step, see the CMake documentation.
To build a CMake projection, you have these choices:
-
In the toolbar, detect the Startup Item dropdown. Select the preferred target and printing F5, or choose the Run button on the toolbar. The projection automatically builds offset, just similar a Visual Studio solution.
-
Right-click on CMake target with CMake Targets View agile in the Solution Explorer and select Build from the context bill of fare.
-
From the main menu, select Build > Build All. Brand certain that a CMake target is already selected in the Startup Detail dropdown in the toolbar.
Equally you would expect, build results are shown in the Output Window and Fault List.

Edit build settings
Visual Studio uses a CMake configuration file to bulldoze CMake builds. CMake configuration files encapsulate build options like native build tool switches and environment variables. If CMakePresets.json is your active configuration file, come across Configure and build with CMake Presets. If CMakeSettings.json is your active configuration file, see Customize CMake build settings. CMakePresets.json is bachelor in Visual Studio 2019 version xvi.10 or later on and is the recommended CMake configuration file.
Debugging CMake projects
All executable CMake targets are shown in the Startup Item dropdown in the toolbar. To showtime debugging, select 1 and press the Debug > Offset Debugging push button in the toolbar. In a CMake project, the "Current document" option is simply valid for .cpp files.

The Debug or F5 commands showtime build the project if changes have been made since the previous build. Changes to the CMake configuration file ( CMakePresets.json or CMakeSettings.json ) or a CMakeLists.txt causes the CMake cache to be regenerated.
You can customize a CMake debugging session past setting properties in the launch.vs.json file. To customize debug settings for a specific target, select the target in the Startup Item dropdown and press Debug > Debug and Launch Settings for <active-target>. For more information on CMake debugging sessions, see Configure CMake debugging sessions.
Just My Code for CMake projects
When you build for Windows using the MSVC compiler, CMake projects have back up for But My Code debugging. To change the Just My Code setting, go to Tools > Options > Debugging > General.
Edit and Continue for CMake projects
When you build for Windows with the MSVC compiler, CMake projects have support for Edit and Continue. Add together the post-obit code to your CMakeLists.txt file to enable Edit and Keep.
if(MSVC) target_compile_options(<target> PUBLIC "/ZI") target_link_options(<target> PUBLIC "/INCREMENTAL") endif() Adhere to a CMake project running on Linux
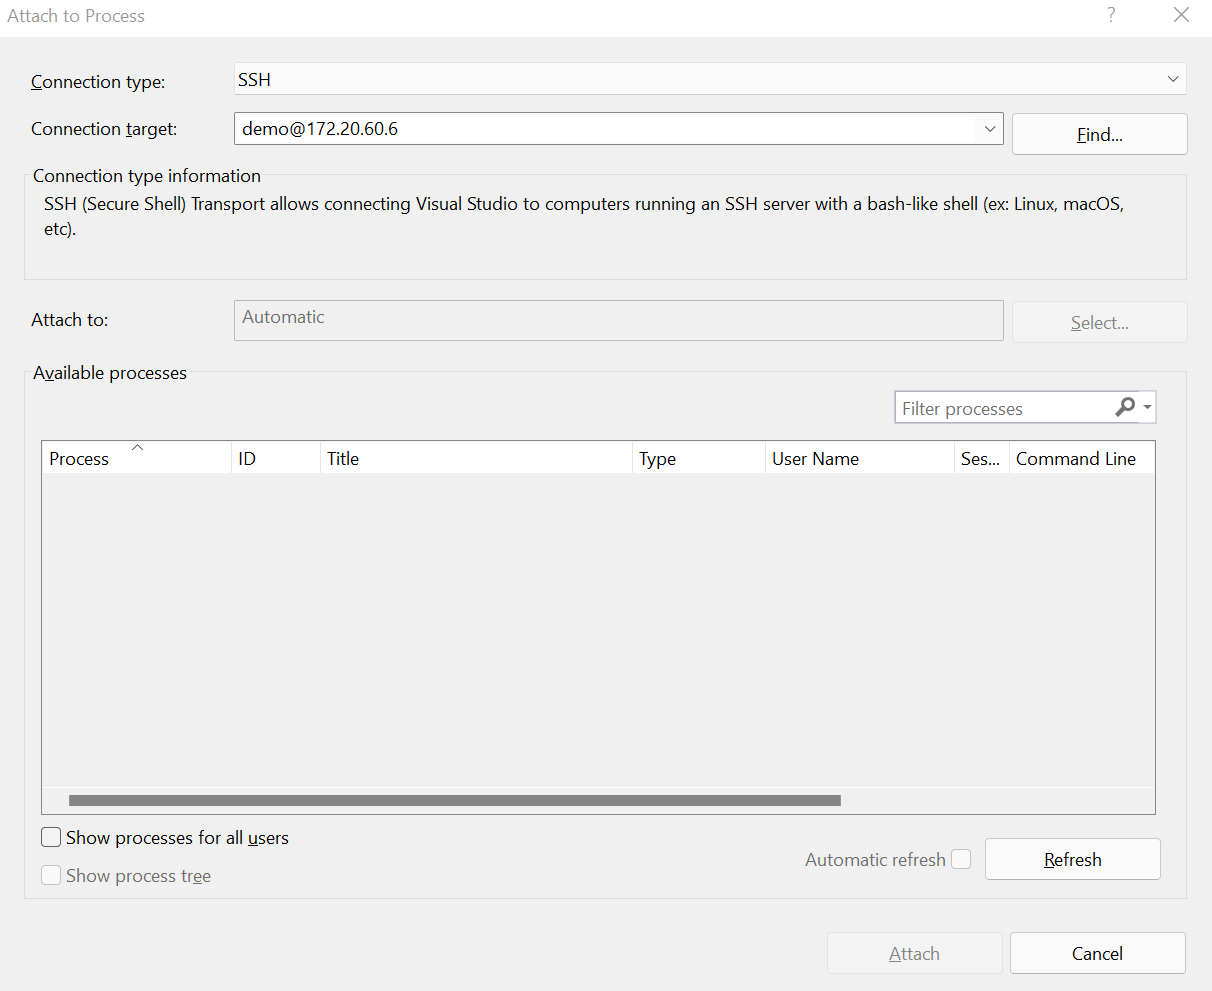
Visual Studio allows you to debug a process running on a remote Linux system or WSL and debug it with the GDB debugger. To become started, select Debug > Attach to Process..., set up the Connection blazon to SSH, and select your Connection target from the listing of connections in the Connection Director. Select a process from the listing of bachelor processes and press Attach. GDB must exist installed on your Linux machine. For more information on SSH connections, see the Connection Managing director
CMake partial activation
In Visual Studio 2022 version 17.i and subsequently, CMake functionality won't exist enabled automatically if your root folder doesn't incorporate a CMakeLists.txt file. Instead, a dialog will prompt you on whether yous'd like to enable CMake functionality for your project. If you refuse, CMake cache generation won't first and CMake configurations (from CMakeSettings.json or CMakePresets.json) won't announced in the configuration dropdown. If you accept, yous'll be taken to a workspace-level configuration file, CMakeWorkspaceSettings.json (stored in the .vs directory), to specify the folders you'd like to enable CMake for. (These folders contain your root CMakeLists.txt files).
The accepted properties are:
| Holding | Description |
|---|---|
enableCMake | Enable Visual Studio'south integration for this workspace. |
sourceDirectory | A cord or array of strings specifying the directory or directories with CMakeLists.txt. Macros (such every bit ${workspaceRoot}) are immune. Relative paths are based on the workspace root. Directories outside of the current workspace will be ignored. |
You can reach CMakeWorkspaceSettings.json through the Projection > CMake Workspace Settings card command at whatever fourth dimension, even if CMake functionality is currently disabled.
Open an existing cache
When you open up an existing CMake cache file ( CMakeCache.txt ), Visual Studio doesn't try to manage your enshroud and build tree for you lot. Your custom or preferred tools accept complete control over how CMake configures your project.
You can add together an existing CMake cache to an open project. It's done the same way you'd add a new configuration. For more information, see our web log post on opening an existing cache in Visual Studio.
Notation
The default existing cache feel relies on cmake-server, which was removed from CMake in version 3.20. To continue using existing cache functionality in Visual Studio 2019 version xvi.x and later, take one of these steps:
- Manually install CMake version three.xix or lower. Then, ready the
cmakeExecutableproperty in your existing enshroud configuration to use that version of CMake. - In your existing cache configuration, gear up the
cacheGenerationCommandbelongings to let Visual Studio request the necessary CMake file-based API files. For more information on that property, encounter CMakeSettings.json reference. - Utilize a query file to asking the CMake file-based API files when generating your enshroud before it's opened in Visual Studio. For query file instructions, see the next department, Advanced CMake cache troubleshooting.
Avant-garde CMake cache troubleshooting
Visual Studio uses the CMake file-based API (in versions three.14 and later) to populate the editor with information specific to your project structure. For more than information, encounter the C++ team web log post on multi-root workspaces and file-based API.
Before generating the CMake cache, your custom or preferred tools may demand to create a query file named .cmake/api/v1/query/customer-MicrosoftVS/query.json in your build output binder (the binder that contains CMakeCache.txt ). The query file should comprise this content:
{"requests":[{"kind":"enshroud","version":two},{"kind":"cmakeFiles","version":1},{"kind":"codemodel","version":2}]} When your custom or preferred tools generate your enshroud, CMake places files under .cmake/api/v1/response that Visual Studio uses to populate the editor with information specific to your project structure.
Editing CMakeLists.txt files
To edit a CMakeLists.txt file, right-click on the file in Solution Explorer and choose Open. If y'all brand changes to the file, a yellowish status bar appears and informs y'all that IntelliSense will update. It gives you a chance to abolish the update operation. For information nigh CMakeLists.txt , encounter the CMake documentation.

As presently as you save the file, the configuration step automatically runs again and displays data in the Output window. Errors and warnings are shown in the Error List or Output window. Double-click on an error in the Error Listing to navigate to the offending line in CMakeLists.txt .

Language services for CMake
Language services for CMake are bachelor in Visual Studio 2019 version 16.5 or later on. It supports lawmaking navigation features like Go To Definition, Peek Definition, and Find All References for CMake variables, functions, and targets in CMake script files. For more information, see Code Navigation for CMake Scripts.

CMake project manipulation
CMake project manipulation is available in Visual Studio 2019 version 16.5 or later. Project manipulation enables you to add together, remove, and rename source files and targets in your CMake project without manually editing your CMake scripts. When you add or remove files from the Solution Explorer, Visual Studio automatically edits your CMake project. There could exist more than one place where it makes sense to add or remove a reference to a CMake script. If and then, Visual Studio asks you where y'all want to brand the alter and displays a preview of the proposed changes. For stride-by-step instructions, come across Add, Remove, and Rename Files and Targets in CMake Projects.

IntelliSense for CMake projects
By default, Visual Studio uses the IntelliSense mode that matches the compiler and target architecture specified past the active CMake configuration.
If CMakePresets.json is your active CMake configuration file, and so you tin specify IntelliSense options using intelliSenseMode and intelliSenseOptions in the Visual Studio Settings vendor map. For more than information, run across the Visual Studio Settings vendor map reference.
If CMakeSettings.json is your agile CMake configuration file, and then you lot can specify IntelliSense options using intelliSenseMode in CMakeSettings.json . For more information, run across the CMakeSettings.json reference.
Configure IntelliSense with CMake toolchain files
In Visual Studio 2019 version 16.9 and after, Visual Studio automatically configures IntelliSense in CMake projects based on CMake variables when y'all use a CMake toolchain file. For more information, meet Configure IntelliSense with CMake Toolchain Files.
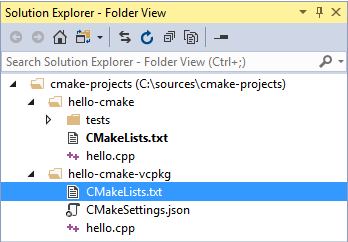
Vcpkg integration
CMake projects opened in Visual Studio integrate with vcpkg, a cantankerous-platform C/C++ dependency manager. Before using vcpkg with Visual Studio, yous must run vcpkg integrate install. For instructions and more data on vcpkg, see the vcpkg documentation.
If CMakeSettings.json is your agile configuration file, Visual Studio automatically passes the vcpkg toolchain file (vcpkg.cmake) to CMake. This behavior is disabled automatically when y'all specify whatever other toolchain in your CMake Settings configuration.
If CMakePresets.json is your active configuration file, you'll demand to set the path to vcpkg.cmake in CMakePresets.json . We recommend using the VCPKG_ROOT environs variable instead of an absolute path to go along the file shareable. For more information, see Enable vcpkg integration with CMake Presets. CMakePresets.json is bachelor in Visual Studio 2019 version 16.10 or later and is the recommended CMake configuration file.
Run CMake from the command line
If CMakePresets.json is your agile CMake configuration file, and so y'all tin easily reproduce your local builds outside of Visual Studio. For more than data, come across Run CMake from the control line or a CI pipeline. CMakePresets.json is supported in Visual Studio 2019 version 16.ten or later on and is the recommended CMake configuration file.
If CMakeSettings.json is your active CMake configuration file, then you'll need to manually pass the arguments that are encoded in your CMakeSettings.json file to CMake. If you have installed CMake from the Visual Studio Installer, you can run information technology from the command line by following these steps:
-
Run the appropriate
vsdevcmd.batfile (x86/x64). For more than data, see Building on the command line . -
Switch to your output binder.
-
Run CMake to build or configure your app.
Visual Studio 2017 has rich back up for CMake, including cross-platform CMake projects. The Visual C++ Tools for CMake component uses the Open up Binder feature to enable the IDE to consume CMake projection files (such as CMakeLists.txt ) directly for the purposes of IntelliSense and browsing. Both Ninja and Visual Studio generators are supported. If you use a Visual Studio generator, it generates a temporary project file and passes it to MSBuild. However, the project is never loaded for IntelliSense or browsing purposes. You lot likewise can import an existing CMake cache.
Installation
Visual C++ Tools for CMake is installed every bit office of the Desktop development with C++ and Linux Development with C++ workloads.
For more information, come across Install the C++ Linux workload in Visual Studio.
IDE integration
When you choose File > Open > Folder to open a folder containing a CMakeLists.txt file, the following things happen:
-
Visual Studio adds a CMake menu item to the main menu, with commands for viewing and editing CMake scripts.
-
Solution Explorer displays the folder structure and files.
-
Visual Studio runs CMake and optionally generates the CMake cache for the default configuration, which is x86 Debug. The CMake command line is displayed in the Output Window, along with other output from CMake.
-
In the background, Visual Studio starts to alphabetize the source files to enable IntelliSense, browsing information, refactoring, and so on. Every bit you piece of work, Visual Studio monitors changes in the editor and too on deejay to proceed its index in sync with the sources.
You can open folders containing whatsoever number of CMake projects. Visual Studio detects and configures all the "root" CMakeLists.txt files in your workspace. CMake operations (configure, build, debug), C++ IntelliSense, and browsing are available to all CMake projects in your workspace.
Y'all can also view your projects organized logically by targets. Choose Targets view from the dropdown in the Solution Explorer toolbar:
Visual Studio uses a file called CMakeSettings.json to store environs variables or command-line options for CMake. CMakeSettings.json also enables yous to define and store multiple CMake build configurations. You tin conveniently switch betwixt them in the IDE.
Otherwise, employ the CMakeLists.txt merely as you would in any CMake project to specify source files, discover libraries, set compiler and linker options, and specify other build system-related information.
If you demand to pass arguments to an executable at debug time, you tin can use another file called launch.vs.json . In some scenarios, Visual Studio automatically generates these files. You can edit them manually, or even create the file yourself.
Note
For other kinds of Open Folder projects, two additional JSON files are used: CppProperties.json and tasks.vs.json . Neither of these are relevant for CMake projects.
Import an existing cache
When y'all import an existing CMakeCache.txt file, Visual Studio automatically extracts customized variables and creates a pre-populated CMakeSettings.json file based on them. The original enshroud isn't modified in whatever mode. Information technology can all the same be used from the control line, or with whatever tool or IDE used to generate information technology. The new CMakeSettings.json file is placed alongside the project'southward root CMakeLists.txt . Visual Studio generates a new cache based the settings file. You tin override automated cache generation in the Tools > Options > CMake > Full general dialog.
Not everything in the cache is imported. Properties such as the generator and the location of the compilers are replaced with defaults that are known to work well with the IDE.
To import an existing cache
-
From the main bill of fare, choose File > Open > CMake:

This control brings up the Import CMake from Cache magician.
-
Navigate to the
CMakeCache.txtfile that you want to import, and then cull OK. The Import CMake Project from Cache wizard appears:
When the wizard completes, you tin encounter the new
CMakeCache.txtfile in Solution Explorer next to the rootCMakeLists.txtfile in your projection.
Building CMake projects
To build a CMake project, you have these choices:
-
In the Full general toolbar, detect the Configurations dropdown. It's probably showing "Linux-Debug" or "x64-Debug" by default. Select the preferred configuration and printing F5, or choose the Run (green triangle) button on the toolbar. The project automatically builds kickoff, only similar a Visual Studio solution.
-
Right-click on
CMakeLists.txtin Solution Explorer and select Build from the context carte. If you lot have multiple targets in your folder structure, you can choose to build all or only one specific target. -
From the main carte du jour, select Build > Build Solution (F7 or Ctrl+Shift+B). Make certain that a CMake target is already selected in the Startup Item dropdown in the General toolbar.

You tin can customize build configurations, environment variables, control-line arguments, and other settings in the CMakeSettings.json file. It lets you brand changes without modifying the CMakeLists.txt file. For more data, see Customize CMake settings.
As you would look, build results are shown in the Output Window and Fault List.
In a binder with multiple build targets, y'all can specify which CMake target to build: Choose the Build item on the CMake menu or the CMakeLists.txt context menu to specify the target. If you enter Ctrl+Shift+B in a CMake projection, it builds the current active document.
Debugging CMake projects
To debug a CMake project, cull the preferred configuration and press F5. Or, press the Run push button in the toolbar. If the Run button says "Select Startup Detail", select the dropdown arrow and choose the target that you lot desire to run. (In a CMake project, the "Current certificate" pick is merely valid for .cpp files.)

The Run or F5 commands first build the projection if changes have been made since the previous build.
You lot tin can customize a CMake debugging session by setting properties in the launch.vs.json file. For more than data, run into Configure CMake debugging sessions.
Editing CMakeLists.txt files
To edit a CMakeLists.txt file, right-click on the file in Solution Explorer and choose Open. If you make changes to the file, a yellow status bar appears and informs you that IntelliSense will update. Information technology gives you a chance to cancel the update functioning. For information virtually CMakeLists.txt , see the CMake documentation.
Equally shortly every bit you relieve the file, the configuration step automatically runs over again and displays information in the Output window. Errors and warnings are shown in the Fault List or Output window. Double-click on an error in the Error Listing to navigate to the offending line in CMakeLists.txt .
CMake configure step
When significant changes are made to the CMakeSettings.json or to CMakeLists.txt files, Visual Studio automatically reruns the CMake configure step. If the configure step finishes without errors, the data that's nerveless is bachelor in C++ IntelliSense and language services. Information technology'due south also used in build and debug operations.
Multiple CMake projects may use the same CMake configuration proper noun (for case, x86-Debug). All of them are configured and built (in their own build root binder) when that configuration is selected. You lot can debug the targets from all of the CMake projects that participate in that CMake configuration.

Yous tin limit builds and debug sessions to a subset of the projects in the workspace. Create a new configuration with a unique name in the CMakeSettings.json file. Then, apply the configuration to those projects only. When that configuration is selected, IntelliSense and the build and debug commands merely use to those specified projects.
Troubleshooting CMake enshroud errors
If you demand more data virtually the state of the CMake enshroud to diagnose a problem, open up the CMake main menu or the CMakeLists.txt context menu in Solution Explorer to run one of these commands:
-
View Cache opens the
CMakeCache.txtfile from the build root folder in the editor. (Any edits you make here toCMakeCache.txtare wiped out if y'all make clean the enshroud. To brand changes that persist after the cache is cleaned, meet Customize CMake settings.) -
Open up Cache Folder opens an Explorer window to the build root folder.
-
Clean Cache deletes the build root folder so that the side by side CMake configure footstep starts from a make clean cache.
-
Generate Cache forces the generate step to run even if Visual Studio considers the environment up to date.
Automatic cache generation tin can be disabled in the Tools > Options > CMake > General dialog.
Single file compilation
To build a single file in a CMake project, right-click on the file in Solution Explorer. Choose Compile from the popular-up carte. You can also build the currently open up file in the editor by using the main CMake menu:

Run CMake from the control line
If you accept installed CMake from the Visual Studio Installer, you can run information technology from the command line by post-obit these steps:
-
Run the advisable
vsdevcmd.batfile (x86/x64). For more information, see Edifice on the Command Line. -
Switch to your output folder.
-
Run CMake to build or configure your app.
In Visual Studio 2015, Visual Studio users tin can employ a CMake generator to generate MSBuild project files, which the IDE then consumes for IntelliSense, browsing, and compilation.
See also
Tutorial: Create C++ cantankerous-platform projects in Visual Studio
Configure a Linux CMake project
Connect to your remote Linux computer
Customize CMake build settings
CMakeSettings.json schema reference
Configure CMake debugging sessions
Deploy, run, and debug your Linux project
CMake predefined configuration reference
Feedback
Submit and view feedback for
Source: https://docs.microsoft.com/en-us/cpp/build/cmake-projects-in-visual-studio
Posted by: mcknightbeficest1967.blogspot.com
0 Response to "How To Use Cmake On Windows"
Post a Comment